Effective Prototype Development
June 8, 2017

Written By:
Martin Hewitt | Product Development Engineer

Don’t Waste Precious Resources
During the space race of the 1960’s, as the legend goes, NASA engineers encountered a challenge. Astronauts needed to take notes in space but typical ballpoint pens did not function in a Zero-G environment. NASA funneled millions of taxpayer dollars into developing a pen that could write upside-down in space on either side of the moon. The Soviets used a pencil.
This legend gets around a lot, but it’s a myth. Pencils are actually dangerous in space! They’re flammable and the tips flake off and float around to be inhaled or short-circuit electronics. The real story is even cooler. An American inventor recognized the need for a space pen, used private capital to develop an innovative product, and sold it to NASA and the Soviets. Capitalism!
If you work in product development, you’ve probably witnessed a team funneling piles of cash into an ill-advised physical prototype. There is a better way. I have two goals for this blog: to make sure you don’t repeat that myth about Soviet pencils, and to show how you can effectively use prototypes to save time and money, and improve your final outcome.
What’s a prototype?
A prototype is defined as: an approximation of a product designed to accomplish a development goal. They are often a physical approximation of a product but not always. DISHER software engineers, graphic designers, and web developers use prototypes too. The key elements of a product prototype are right in the definition: an approximation and a goal. The level of approximation in a prototype varies widely depending on the objective.
Why build a prototype?
There is a prototype phase/milestone in every basic product development plan I’ve seen. When used correctly, prototypes can reduce the cost and accelerate the timeline of a development project in three ways.
Prevent Costly Iterations
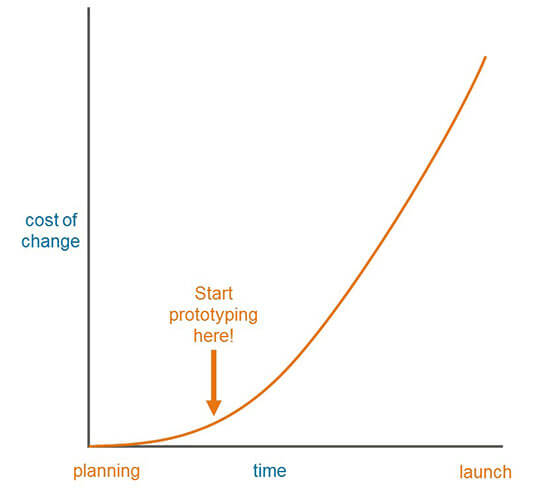
The cost-of-change curve is cited widely in software development projects, but the concept is applicable to any product development. The idea is that the earlier in a program mistakes are caught, the less expensive it is to correct them. Building prototypes can help identify engineering or human-factor problems early in the project. It can also reduce the likelihood of mistakes down the line. Building a prototype with machined or 3D-printed parts to verify that components mate correctly is much cheaper than rebuilding a tool to make adjustments after production has begun.
Accelerate Future Development Steps
The exercise of planning and building a prototype can have spillover effects in future phases of a project that accelerate outcomes. For a development team on a complex product, the challenge of building an integrated prototype forces teamwork and knowledge sharing that makes future design and engineering more efficient as team members can anticipate how their work will affect their counterparts’. A prototype can also make production ramp-up smoother. Manufacturing and assembly process flows can be informed by issues encountered and resolved during prototype assembly. Toolmakers also benefit from physical models to design and build tools that achieve the design intent of the component.
Parallel Pathing
For complex products, especially those with integrated electronics and software, building prototypes can shorten the critical path of the product from idea to launch. Electronics and software developers benefit from constantly testing and rapidly iterating their designs. If the mechanical team can supply a proof-of-concept prototype to the electronics team for testing, the software advanced development and mechanical engineering can proceed in parallel rather than one team waiting for the other to finalize their design.
Steps to Effective Prototype Development
1. Determine and Agree on Prototype Objectives
2. Build a Prototype at the Right Level of Approximation
3. Use the Prototype for Testing
Step 1: Determine and Agree on Prototype Objectives
Within product development, the objective of a prototype is usually one or a combination of the following.
Learning: In the early phases of any new product development, many questions will come up about technical feasibility of a new approach or the marketability of a new feature. Building a prototype is often the fastest way to answer these questions about a product or concept. To return to the example of a Space Pen, some potential questions that could be answered by building a prototype are:
+ Does this concept write upside down?
+ How easy is it to handle with thick gloves?
+ Does it write after sitting in the freezer for an hour?
One of my favorite Culture Characteristics at DISHER is Just Do It. When it comes to fast learning in product development, this strategy can be spun as Just Try It. Often when I am in a bind trying to solve a tough product problem, I remind myself to just head to the shop and build a quick mock-up of whatever concept I am working on. Getting the product in your hands and seeing how it works (or more often, doesn’t work) often gives clarity that thinking about the problem at your desk does not.
Communicating: It’s difficult to have substantive conversations about a hypothetical product. Concept descriptions, sketches, and renderings are low-investment methods that are adequate to communicate product ideas in many circumstances. However, in some situations, a tactile, interactive representation of a product is critical for communicating your message to potential customers, top management, or investors.
+ For user feedback in an interview or focus group, a demo prototype helps a user understand the product and give more detailed responses.
+ For internal reviews with top management or leadership, a prototype can demonstrate significant progress in development of the product and secure commitment to the program.
+ When pursuing additional investment in a product idea, a functioning prototype can emphasize the feasibility or marketability of a product idea to reduce the perceived risk in investment for your company’s resources or outside investors.
Integrating: A comprehensive prototype is the first coordinated effort to integrate the work of different members or groups of the development team. Integrating the subassemblies of a complex product for the first time can reveal unforeseen challenges. Add in batteries, electronics, and software demanded by many consumers in our connected, try to put it all together for the first time— and prepare to learn a lot in a hurry. A few examples of learning moments that are common in the integration phase:
+ “So it’s all in the car, and we just have to connect the wires and it will work, right?” (wrong)
+ “It was working on the bench…”
+ “Huh, we probably shouldn’t have a magnet there.”
Of course, we do all we can in prototype development to minimize integration pains. DFMEA, cross-team design reviews, and bench testing can catch some mistakes before the build starts. However, integrating the efforts of all the development team members into one comprehensive prototype inevitably reveals unforeseen issues that allow you to improve your product before it goes to manufacturing.
Step 2: Build a Prototype at the Right Level of Approximation
Once we’ve determined the objectives of a prototype – what questions it should answer, who we are communicating to, and what level of integration is needed – we need to plan what type of prototype to build to meet the objective. Below are two prototypes built to very different levels of approximation of the final product. The comparison shows the wide variety of prototypes that can be built, depending on the objective.
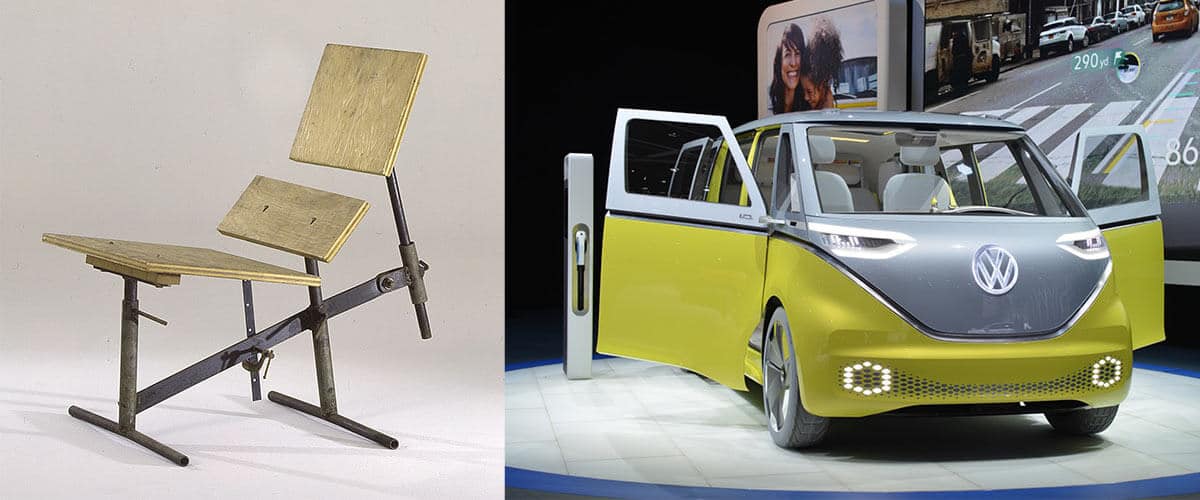
(Left:) This mid-century chair jig from the Eames Office was used to evaluate seat and back ergonomics. (Right:) This VW Electric Microbus concept was used to show off new technology and styling and to enhance brand awareness.
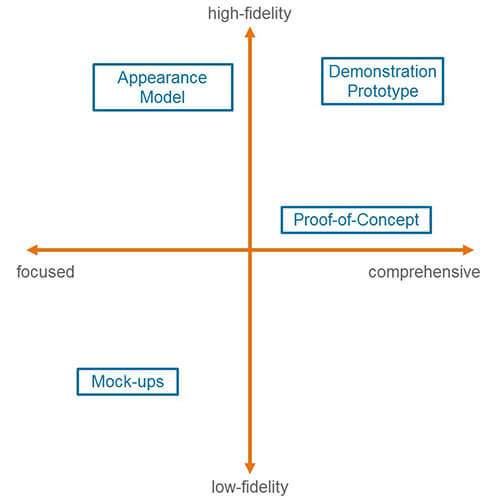
There isn’t a single universal way to classify prototypes. One of my favorite taxonomies comes from the Design School at Loughborough University. Their handy iD Cards list sixteen different classes of physical models and prototypes. To make it a little simpler, I like to plan prototypes based on two dimensions: fidelity and comprehensiveness.
The fidelity of a prototype describes how closely it approximates production-quality appearance and feel. Low-fidelity prototypes usually use materials and processes that are fast and cheap. For example, a low-fidelity prototype space pen might be built with a section of PVC pipe for the housing. High-fidelity prototypes use production-intent materials and processes or detailed imitations of those materials and processes. A production-intent thermoformed part could be formed on prototype tooling to closely match the properties and performance of the final part. A production-intent casting could be CNC machined for a high-fidelity prototype.
The comprehensiveness of a prototype describes how many features of the final product are replicated in the prototype. A very focused prototype may be a single component out of the entire product. For example, a variety of Space Pen grip concepts could be 3D-printed and tested for ergonomics. A fully comprehensive prototype would include all major features and functions.
When we put these concepts together, we have a map of prototype levels. I’ve called out four common classes of prototype used in DISHER’s product development process and their relative positions on the map.
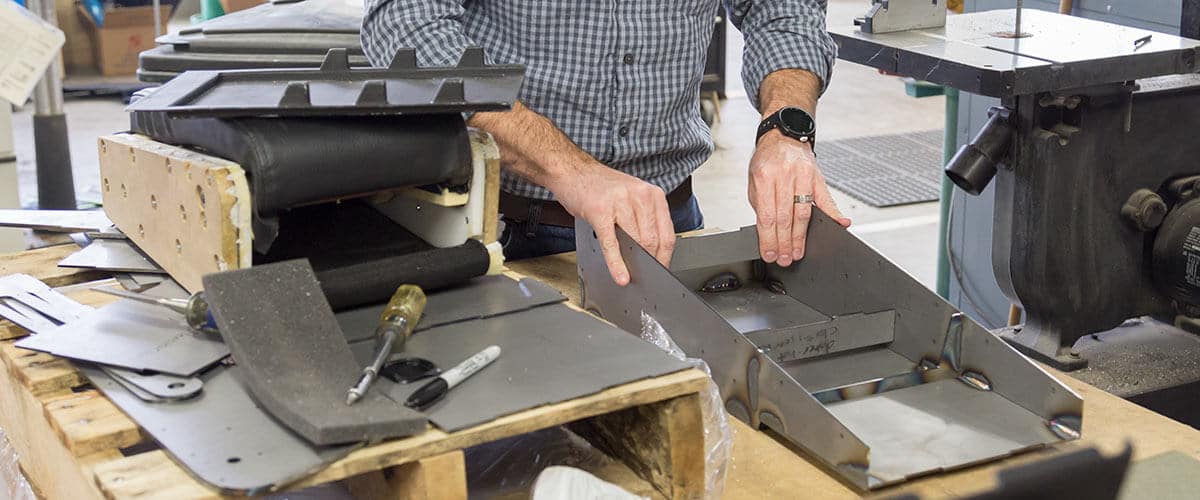
1. Mock-up: Mockups are low-fidelity prototypes that can be built quickly with low investment. I often use foam board, plywood, sheet metal, or similar on-hand materials for mockups. These prototypes are often exploratory, allowing me to test a hunch or simply have something physical to knock around and generate ideas. Mock-ups are usually focused on a narrower set of functions or components of the final product.
2. Proof-of-Concept: A Proof-of-Concept (PoC) prototype is used to validate that an idea functions as envisioned. PoC’s usually represent a significant amount of design work. After building mock-ups and analyzing a design concept, a combination of off-the-shelf and/or custom parts are assembled to prove the design works as intended. A PoC will be fairly comprehensive, including most of the core functions of the final product. Materials, finishes, and manufacturing processes will prototype-level and likely not match the design intent of the final product. PoC’s are used to vet a product inside the development organization rather than market to customers. A Proof-of-Concept can also be called a Functional or Works-Like prototype.
3. Appearance Model: Appearance Models are built to look nearly exactly like a finished product on the outside, but often do not have any functioning parts underneath. These models are critical in consumer products where human factors and customer perception are critical to a design’s success. Appearance Models are used for marketing materials, photography, and user feedback and are seen often at trade shows. Appearance Models are built from one-off prototype parts, often formed and finished by hand by an experienced model-maker. These parts are not made from production-intent manufacturing processes, but are intended to duplicate the production form and finish. An Appearance Model can also be called an Aesthetic or Looks-Like prototype.
4. Demonstration Prototype: A Demonstration Prototype combines aspects of Proof-of-Concept and Appearance Models into one prototype that is fully functional and show-worthy. Demonstration Prototypes typically have components that are near production-intent, though not always created on production tooling. These prototypes are used to demonstrate and evaluate full product potential. Depending on the product or market, the Demonstration Prototype may be limited to internal reviews for confidentiality or demonstrated at a trade show to promote the product. User interaction with the fully functional product is a powerful aspect of Demonstration Prototypes.
Step 3: Use the Prototype for Testing
Once a prototype is constructed, it’s critical to test with the prototype and document the results. Whether the goal is learning, communicating, or integrating, there should be a concrete testing plan that will inform how the prototype is performing. When possible, use quantifiable metrics. For example:
+ Can the chair support 300 lbs?
+ How many people interacted with the prototype at the trade show?
+ How long can the tool operate on one battery charge?
Document the prototype testing results with the date, iteration, and methodology. Photos of the prototype are essential for referring back to in design reviews and future development.
Iterate!
What comes after a prototype? Usually another prototype. Product design is an iterative process. A development team will repeat this 3-step prototyping process many times before launching a product. After each iteration, the design will be more complete, refined, and functional. From mockups and a Proof-of-Concept to a Demonstration Prototype and a pre-production model, this iterative prototyping process ensures a development team uses time and resources effectively and efficiently to develop what we all want— a product that looks good and works well.
If you need help with prototypes or product development, our talented team of engineers, designers, and researchers would love to come alongside your team and help you save time and money throughout the process. DISHER offers a variety of collaborative tools depending on your specific needs: Whiteboard Workshops, Innovation Workshops, and deep expertise for each element of product development.
Written By: Martin Hewitt, Product Development Engineer
Martin spent three years as a Disher engineering intern and became a leading draft pick upon graduation for Disher’s product development team. Martin is a graduate of Northwestern University with a BS in Materials Science and Engineering. In his free time, he enjoys reading, podcasts, running, hiking, trivia, and soccer. If he could live anywhere in the world, he’d choose Seattle because it smells like the ocean and he wouldn’t get sunburned.

